1. Introduzione
This manual provides essential information for the safe and effective operation, assembly, maintenance, and troubleshooting of your SENIX STE15 21-inch 15Amp Corded Electric Snow Blower. Please read these instructions thoroughly before using the product and retain them for future reference. Understanding and following these guidelines will help ensure optimal performance and extend the life of your snow blower.
2. Informazioni sulla sicurezza
Dare sempre priorità alla sicurezza quando si utilizzano apparecchiature elettriche. Il mancato rispetto delle istruzioni di sicurezza può causare gravi lesioni o danni materiali.
- Leggi l'intero manuale: Familiarizzare con tutti i comandi e le procedure di utilizzo corrette.
- Indossare un abbigliamento appropriato: Always wear safety glasses or goggles, hearing protection, and appropriate footwear. Avoid loose clothing that could get caught in moving parts.
- Ispezionare l'area: Before starting, clear the area of any objects such as rocks, toys, or debris that could be thrown by the auger.
- Mantenere una distanza di sicurezza: Tenere a distanza di sicurezza gli astanti, i bambini e gli animali domestici dall'area operativa.
- Handle Power Cord Safely: Ensure the extension cord is rated for outdoor use and sufficient gauge for the distance. Keep the cord clear of the auger and away from the discharge chute.
- Never Direct Discharge Towards People: Always direct snow discharge away from people, vehicles, and windows.
- Evitare il sovraccarico: Do not attempt to clear snow at a rate faster than the machine is designed for. Reduce the clearing width if snow is deep or heavy.
- Clear Clogs Safely: If the discharge chute becomes clogged, turn off the snow blower, unplug it, and wait for all moving parts to stop before attempting to clear the obstruction with a clean-out tool, never your hands.
- Operate in Daylight or Good Artificial Light: Ensure adequate visibility during operation. The built-in LED lights assist in low-light conditions.
- Stai attento: Pay attention to your surroundings and avoid distractions.
3. Assemblaggio e configurazione
Your SENIX STE15 snow blower requires minimal assembly. Follow these steps to prepare your unit for use.
- Assemblaggio maniglia: Fissare la maniglia superiore a quella inferiore utilizzando le manopole e i bulloni forniti. Assicurarsi che tutti i collegamenti siano ben saldi.
- Montaggio dello scivolo: Secure the discharge chute to the main housing. Ensure the chute rotation mechanism is properly engaged.
- Gestione del cavo di alimentazione: Attach the cord retention hook to the handle. This helps keep the extension cord away from moving parts during operation.

The snow blower features a dual safety switch for safe startup. First, press the lock-off button, then engage the switch lever to start the motor.

The handle is designed to fold up in seconds for easy and compact storage, reducing the unit's height significantly.
4. Funzionamento
Follow these steps for effective and safe snow removal with your SENIX STE15 snow blower.
- Connetti alimentazione: Plug a suitable outdoor-rated extension cord into the snow blower's power inlet, then connect the other end to a standard 120V AC outlet. Ensure the cord is securely held by the cord retention hook.
- Avvia l'unità: Press the safety lock-off button, then squeeze the switch lever to start the motor.
- Adjust Chute Direction: Use the 180-degree rotating chute control to direct the snow discharge away from desired areas.
- Adjust Throw Height: The snow throw height adjustment allows you to control the vertical trajectory of the snow.
- Begin Clearing: Push the snow blower forward into the snow. For optimal performance, overlap each pass slightly.
- Utilize LED Lights: The built-in LED light bar provides enhanced visibility when operating in low-light conditions, such as early mornings or late evenings.
- Manovra: The 7-inch rear wheels facilitate easy movement and control of the snow blower.
- Arrestare l'unità: Release the switch lever to stop the motor. Unplug the unit from the power source after use.
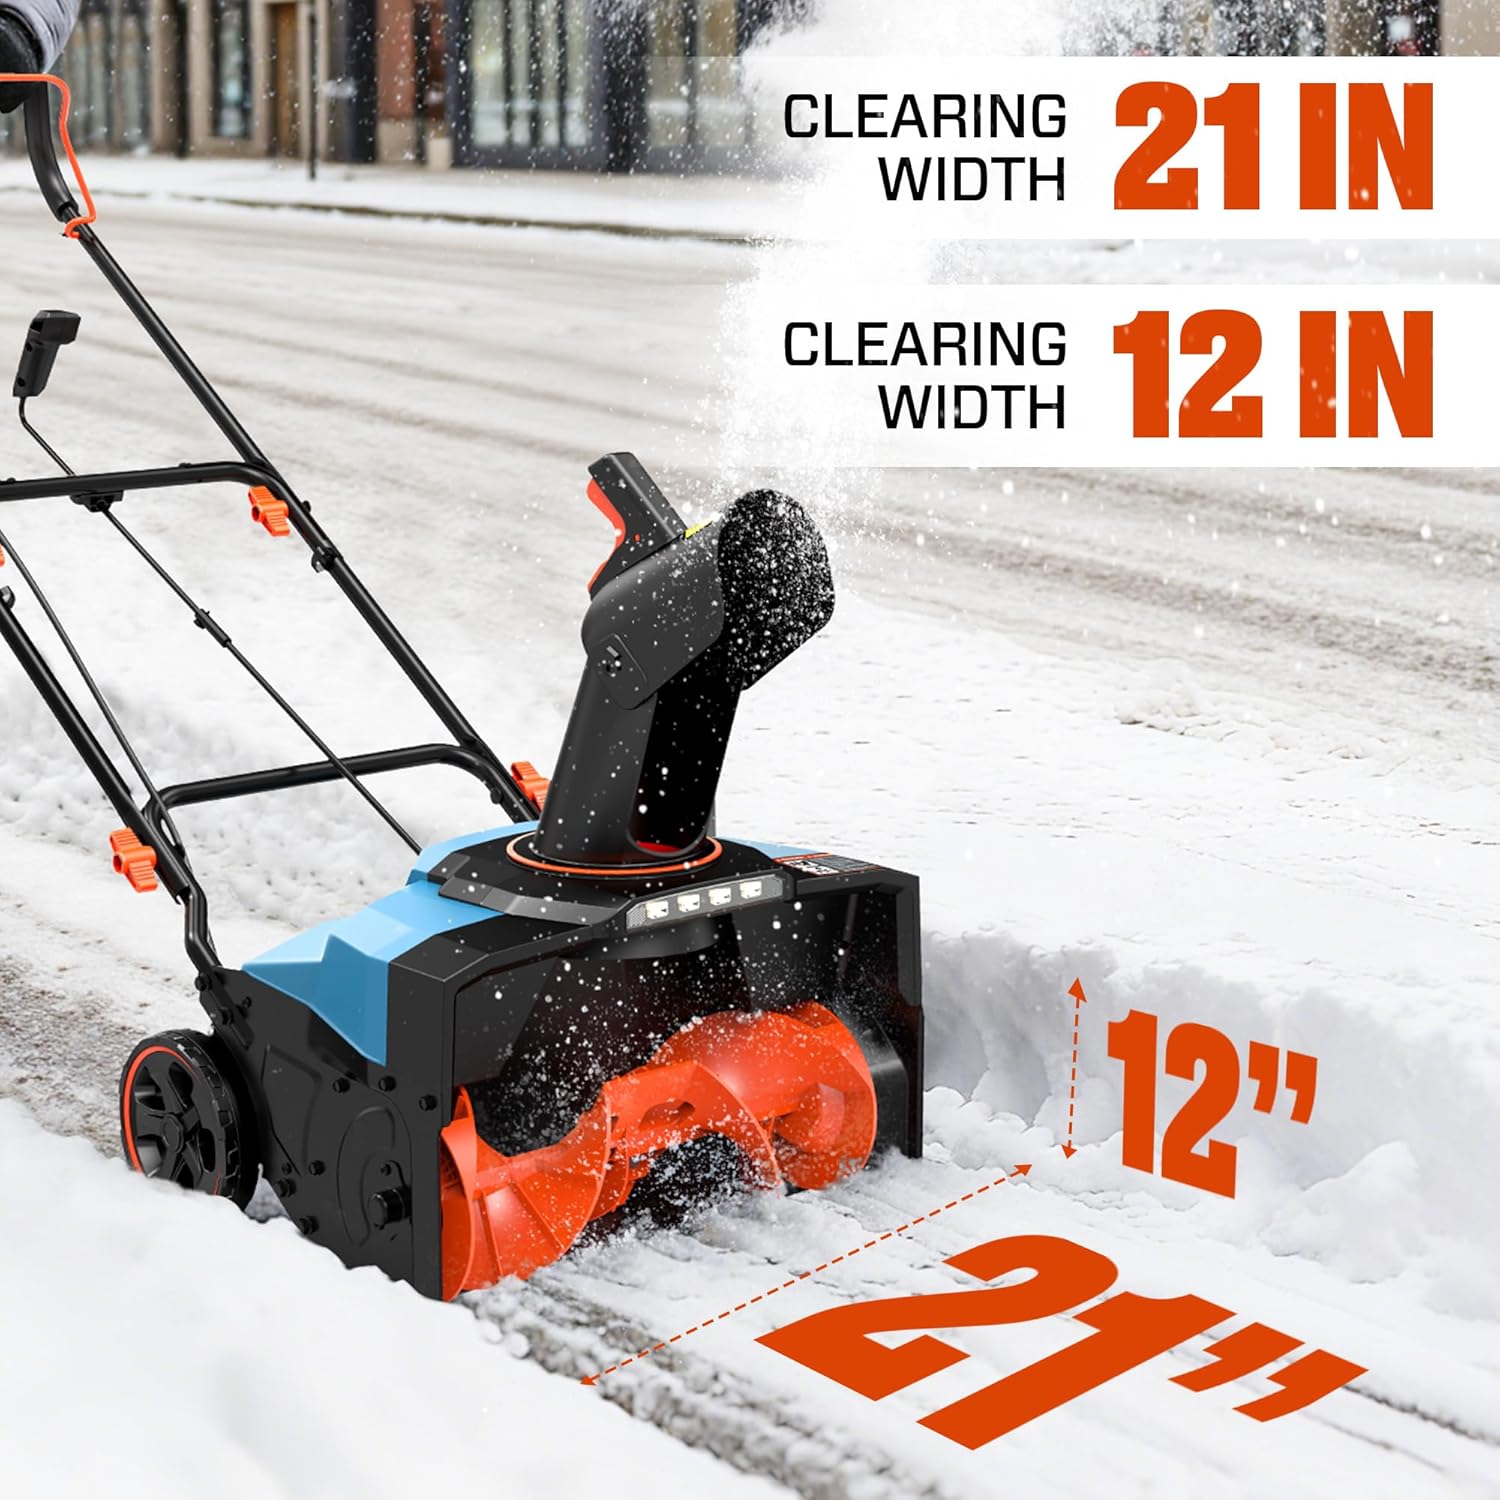
The snow blower is designed with a 21-inch clearing width and a 12-inch clearing depth, allowing for efficient removal of snow from mid-sized areas.

The powerful motor enables the snow blower to throw snow up to 33 feet, helping to clear large areas quickly.

The adjustable snow chute allows for precise control over the direction and height of the snow discharge, with a 180-degree rotation capability.
5. Manutenzione
Una manutenzione regolare garantisce la longevità e le prestazioni ottimali del vostro spazzaneve.
- Dopo ogni utilizzo: Disconnect power. Clean snow and debris from the unit, especially around the auger and discharge chute. Inspect the auger for wear or damage.
- Ispezione del cavo: Regularly check the power cord and extension cord for cuts, fraying, or damage. Replace damaged cords immediately.
- Barra di trivellazione e raschiatura: Inspect the auger blades and the scraper bar for wear. Worn parts can reduce clearing efficiency. Replace as needed.
- Magazzinaggio: Store the snow blower in a dry, protected area. The foldable handle allows for compact storage.
6. Risoluzione Dei Problemi
Fare riferimento a questa sezione per i problemi più comuni e le relative soluzioni.
| Problema | Possibile causa | Soluzione |
|---|---|---|
| Lo spazzaneve non si avvia | No power supply; Safety switch not engaged; Damaged cord | Check power connection and outlet; Ensure both safety lock-off button and switch lever are pressed; Inspect and replace damaged cords. |
| Poor snow throwing performance | Clogged chute; Worn auger or scraper bar; Overloading | Turn off and unplug, then clear chute with a tool; Inspect and replace worn auger/scraper bar; Reduce clearing width/speed. |
| L'unità si arresta durante il funzionamento | Overload protection activated; Loose power connection | Reduce load, allow motor to cool; Check power cord connections. |
7. Specifiche
Key technical specifications for the SENIX STE15 Corded Electric Snow Blower.
- Modello: STE15
- Fonte di energia: AC Electric
- Motore: 15 Amp
- Larghezza di compensazione: 21 pollici
- Profondità ideale della neve: 12 pollici
- Distanza di lancio: Fino a 33 piedi
- Rotazione dello scivolo: 180 gradi
- Peso dell'articolo: 41 libbre
- Dimensioni del prodotto: 25"P x 18"L x 21"A
- Caratteristiche: LED Lights, Foldable Handle
8. Garanzia e supporto
SENIX provides a warranty for this product to ensure customer satisfaction.
- Garanzia sullo strumento: This SENIX snow blower comes with a 5-year tool warranty. Please refer to the warranty card included with your product for full terms and conditions.
- Assistenza clienti: For technical assistance, replacement parts, or warranty claims, please contact SENIX customer service. Visit the official SENIX websito o fare riferimento alle informazioni di contatto fornite sulla confezione del prodotto.
