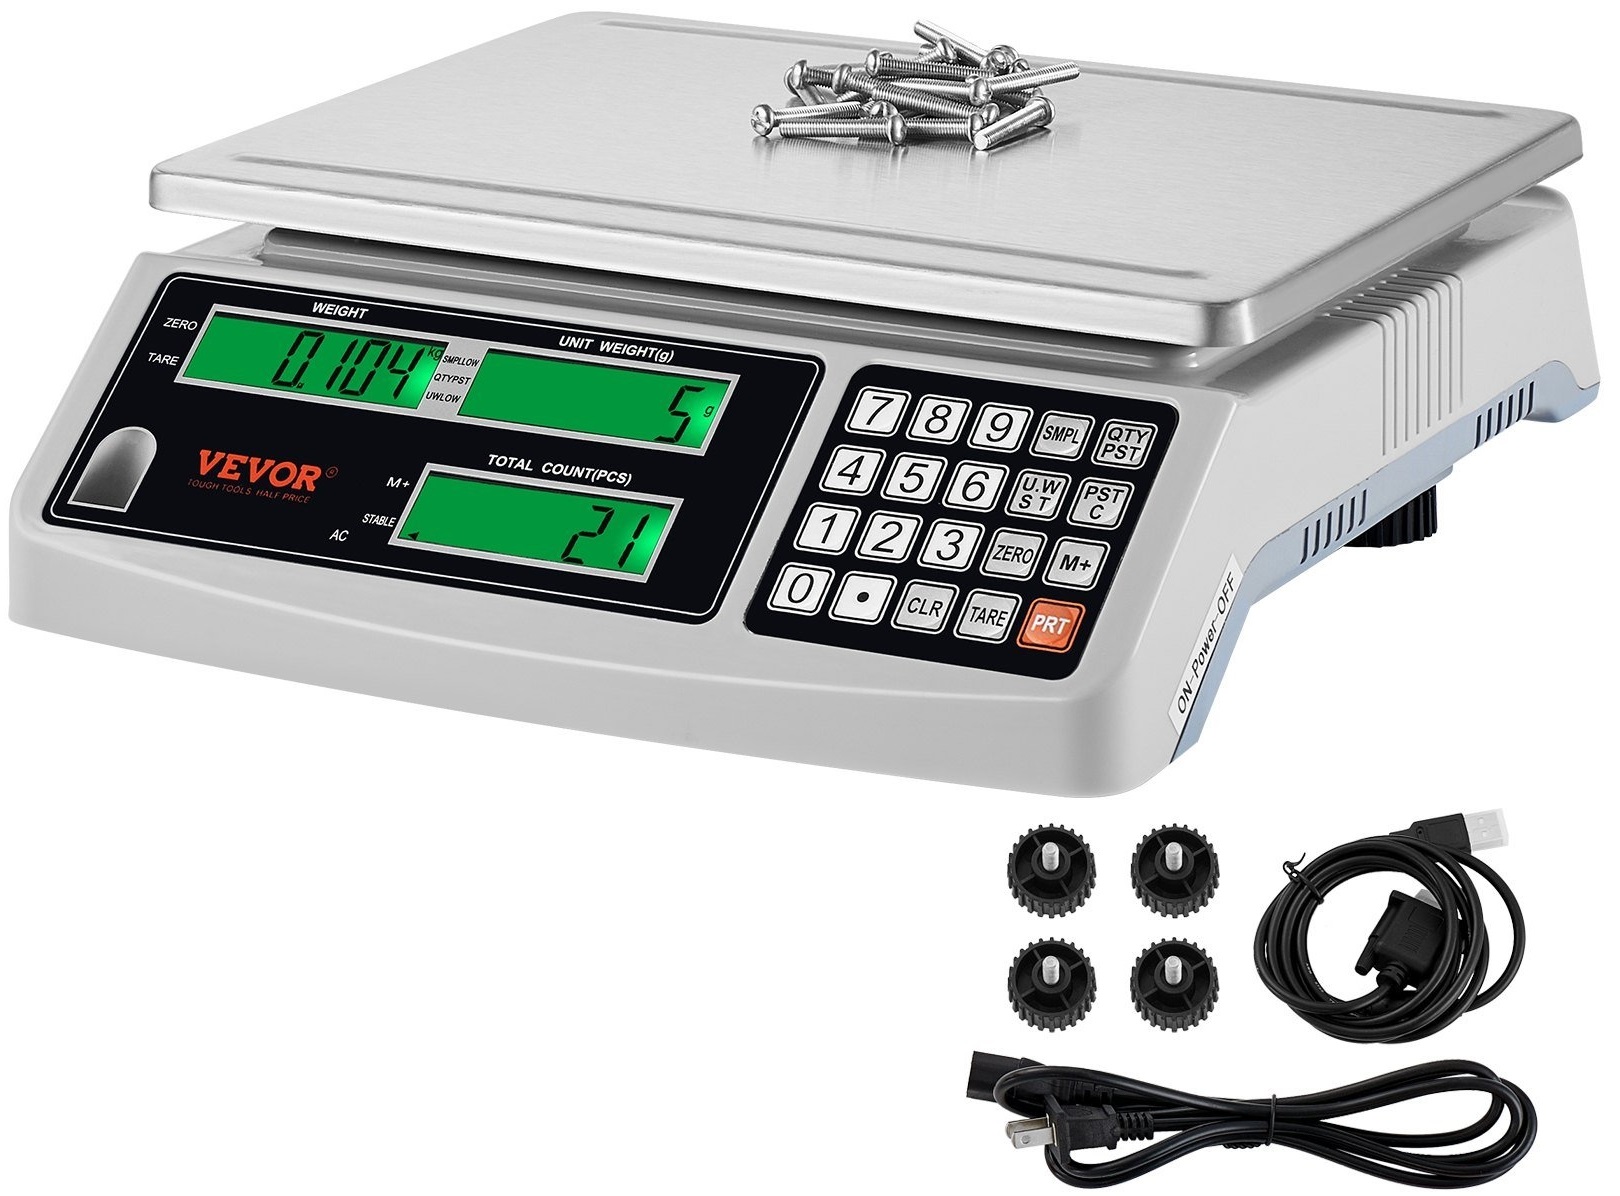
VEVOR KF-H2C,KF-H2D Counting Scale
Specifiche
- Modello: KF-H2C / KF-H2D
- Funzione: Autozero; Counting; ADD; TARE; Backlight
- Energia: DC 6V/4AH rechargeable battery
- Consumo energetico: DC 38 mA (DC 58 mA with backlight)
- Capacità: Da 1g a 30.009kg
- Unit Choose: Kg/g/lb
Istruzioni per l'uso del prodotto
- Main Technical Function
- Funzione: Autozero; Counting; ADD; TARE; Retroilluminazione
- Energia: DC 6V/4AH rechargeable battery
- Consumo energetico: CC 38 mA (CC 58 mA con retroilluminazione)
- Allarme di bassa potenza: Quando viene visualizzato "()" significa che è necessario per caricare. Se continui a usarlo, è facile che la bilancia si rompa.
- Dati tecnici
- Capacità: Da 1g a 30.009kg
- Unit Choose: Premere i rispettivi pulsanti per scegliere tra unità kg, g o lb.
- Conteggio
- Prima di contare: Ottieni samples per determinare il peso unitario o pz.
- Quando il peso unitario è sconosciuto:
- Metti sampmeno di beni rilevanti sul piatto con lo stesso peso.
- Eg, for unit G, put 30 pcs of screws of the same weight on il piatto.
- Inserisci il numero di samples (eg, PCS 30) to display weight, peso unitario e conteggio totale.
- Continua ad aggiungere prodotti al piatto; il peso totale e il conteggio saranno cambiano mentre il peso unitario rimane costante.
Domande frequenti
- Q: How do I know when to charge the scale?
- A: L'allarme di bassa potenza indicherà quando è necessaria la ricarica. Se ignorata, potrebbe danneggiare la bilancia.
- D: Come faccio a scegliere l'unità di misura (kg/g/lb)?
- A: Premere i pulsanti corrispondenti per selezionare tra unità kg, g o lb.
“`
Supporto tecnico e certificato di garanzia elettronica www.vevor.com/support
Bilancia contapezzi MANUALE UTENTE
MODELLO: KF-H2C / KF-H2D
We continue to be committed to providing you tools with competitive price. “Save Half”, “Half Price” or any other similar expressions used by us only represents an estimate of savings you might benefit from buying certain tools with us compared to the major top brands and does not necessarily mean to cover all categories of tools offered by us. You are kindly reminded to verify carefully when you are placing an order with us if you are
risparmiando effettivamente la metà rispetto ai marchi più importanti.
MODELLO: KF-H2C / KF-H2D
BILANCIA PER CONTEGGIO
(L'immagine è solo di riferimento, fare riferimento all'oggetto reale)
HO BISOGNO DI AIUTO? CONTATTACI! Hai domande sul prodotto? Hai bisogno di supporto tecnico? Non esitate a contattarci:
Supporto tecnico e certificato di garanzia elettronica www.vevor.com/support
Questa è l'istruzione originale, si prega di leggere attentamente tutte le istruzioni del manuale prima di utilizzare. VEVOR si riserva una chiara interpretazione del nostro manuale utente. L'aspetto del prodotto sarà soggetto al prodotto ricevuto. Vi preghiamo di perdonarci se non vi informeremo di nuovo se ci sono aggiornamenti tecnologici o software sul nostro prodotto.
-1-
Main Technical Function
A. Funzione tecnica principale.
1.Funzione:
Azzeramento automatico; Conteggio; AGGIUNGI; TARA; Retroilluminazione
2. Potere
CA 220-240 V (±10%) 50 Hz ± 1 Hz
CA 110 V (±10%) 60 Hz ± 1 Hz
Batteria ricaricabile DC 6V / 4AH
3. Consumo energetico
DC 38 mA DC 58 mA con retroilluminazione
4. Watt 0.4 W con retroilluminazione 5. Allarme basso consumo
When it shows (
) significa che è necessario caricarlo. Se continui a usarlo, è facile
broke the scale.
B. Dati tecnici
Capacità 1
capacità
(N)
(e) (d)
(max) (min) zero Tare(max) Overload(max+9e)
15000.0g 15000.0g 0.5g 0.5g 15000.0g 10g ±300g 0~15000.0g
15004.5g
30,000kg 30,000kg 1g 1g 30,000kg 20g ±600g 0~30,000kg
30.009 kg
NotesFS= MAX WEIGHT of division
Osservazione aggiuntiva
When the division 1g, generally the unit is KG(eg 1g, 2g, 5g), When the
division<1g, generally the unit is G(eg 0.1g, 0.2g, 0.5g)
-2-
Istruzioni per l'uso
C. Operation instructions.
1. Prima dell'uso
(1). Posizionare la bilancia su una superficie piana e stabile. È possibile stringere o allentare i quattro piedini per assicurarsi che siano alla stessa altezza. È presente una sfera di livellamento su di essa. (2). Non utilizzarla in ambienti ostili come vento forte e sole splendente. (3). Utilizzare solo l'alimentatore. (4). Non appoggiare oggetti sul piatto quando si accende la bilancia. (5). Durante la pesatura, assicurarsi di posizionare l'oggetto al centro del piatto, non sopra di esso. (6). Accendere la bilancia dopo 15-20 minuti: la pesata è più precisa.
(7).Mostra
è necessario prima caricare.
2. Dispaly:
A: Quando l'unità è KG, il peso verrà visualizzato come 0.000 come nell'immagine:

or
-3-
B: Quando l'unità è G, il peso verrà visualizzato come 0.0 come nell'immagine:
or
(1).PESO
6 digital for the goods weight and add weight and the left digital can display[- ]
(2).UNIT WEIGHT
5 digitali per il peso unitario e i tempi di aggiunta. Il punto è che può cambiare.
(3).QUANTITY
6digital per i pezzi della merce
3.Symbol” ”
(1). or Net or Taremeans has been cut the weight of packing (2). or Zeromeans no weight (3).+ or M+means ADD (4). or Stable or ~: Means on stable (5).SMPLOWmeans sample non è sufficiente. il peso del sample sul piatto è inferiore al peso di min sample, per favore aggiungi l'unità di pezzi questo simbolo scompare. (6).QTYPST UWLOWQuando i pezzi sono bassi come impostato, scatta l'allarme e QTYPST UWLOW.
(7).
Significa che la batteria è scarica, è necessario ricaricarla.
Osservazione
Bilancia di conteggio ad alta precisione: Min samppeso unitario = 20d Peso unitario minimo =
0.2d ( d=division) counting scale Min sample weight = 40d Min unit weight= 0.8d ( d=division)
-4-
KEYBOARDFUNCTION
4. TASTIERA
ORO
(Senza RS-232)
(con RS-232)

4.1 Descrizione della funzione del tasto composito
+Tasti numerici0–2converte le unità
+Tasti numerici4–6regolano la luminosità
+ imposta i limiti superiore e inferiore dell'allarme lungo
Premere per accedere alle impostazioni della svegliaPremere per chiuderePremere per impostare
l'esterno dei limiti superiore e inferiore dell'allarmePremere per impostare l'interno di
i limiti superiore e inferiore dell'allarmePremere per impostare i limiti superiori dell'allarme
allarmePremere per confermare
4.2 Tasto funzione
: Quando il peso unitario è sconosciuto, imposta il numero di articoli da sampguidato
:When the unit weight is knownConfirm the input weight:Use this key to set the alarm value when a fixed number of alarms are required
-5-
:Disattiva la funzione di allarme
:Add up the quantity of goods :Cancel the total amount of the accumulated items :Remove the weight of tare :Return the scale to zero as far as possible :Clear the number :Print the current weight, single weight, quantity ,and the cumulative data (Note: with the RS232)
FUNZIONE
5. FUNZIONE
5.1. Pulsante ON-OFF
Mettere ON/OFF su “” significa accendere.
Posizionare ON/OFF su “O” significa spento.
5.2. Auto Backlight
Press, when it displays “
"premere
, mostrerò”
". Metti il
goods on the plateweight >10d, the light is on auto, when it is zero, the light is
auto off.
Luce sempre accesa
Premere
when it displays”
"premere
verrà visualizzato " ", Luce accesa su tutti
il tempo .
Light off all the time press, when it display “off all the time.
"Premere
it will display ” “, the light
When you turn off the scale, it will memory what you have chosen
-6-
5.3.Scegli l'unità di misura Kg/g/lb
Premere
quando viene visualizzato"
" quindi premere
, l'unità è "kg".
Premere
quando viene visualizzato"
" quindi premere , l'unità è "g".
Premere
quando viene visualizzato"
" quindi premere , l'unità è "lb".
5.4. Conteggio
5.4.1 Prima di contare, è necessario procurarsi alcuni sampper conoscere il peso unitario o dei pezzi (1) Quando il peso unitario è sconosciuto
Metti la samples di beni rilevanti sul piatto (il peso di ogni sample must be the same): Eg (A): when the unit is G, put 30pcs screws of each same weight on the plate, It will display:
Peso
Peso unitario Conteggio totale
[ 53.1g ] [ 0 ]
[0]
Inserire il PCS “30” del samples(Viti), verrà visualizzato:
Peso
Peso unitario Conteggio totale
[53.1g]
[30]
[0]
Quindi premere , verrà visualizzato:
Peso
Peso unitario Conteggio totale
[53.1g]
[1.77g]
[ 30 ]
At this moment you can continue to put the more goods (eg: screws) on the plate, the Total weight & Total count will change constantly, the unit weight won’t be changed.
Eg (B): when the unit is KG, put 30pcs screws of each same weight on the plate, It will display:
Peso
Peso unitario Conteggio totale
[ 0.053kg ] [ 0 ]
[0]
-7-
Inserire il PCS “30” del samples (Screws), it will display:
Peso
Peso unitario Conteggio totale
[0.053 kg]
[30]
[0]
Quindi premere , verrà visualizzato:
Peso
Peso unitario Conteggio totale
[0.053 kg]
[1.766g]
[ 30 ]
At this moment you can continue to put the more goods (eg screws) on the plate, the Total weight & Total count will change constantly, the unit weight won’t be changed.
(2) Know the unit weight(eg screws)
Quando sai che il peso di una vite è 1.766 g,
A: if the unit is G, Input the unit weight 1.766, it will display:
[0.0g]
[1.766g] [0]
Then Press, and put the more goods(eg:30 pcs screws) on the plate,
[53.0g] [1.766g] [30] If at this moment you continue to put the more pcs, the Total weight & Total count on the window will change constantly, the unit weight won’t change. B:If the unit is KG, Input the unit weight 1.766, it will display:
[0.000 kg]
[1.766g] [0]
Quindi premere
, and put the more goods(eg:30 pcs screws) on the plate,
[0.053 kg] [1.766 g ] [30 ]
Infine, quando si tolgono tutti i beni dal piatto, la finestra dell'unità rimane ancora
visualizza il valore, puoi premere
.
-8-
Le sample is more, the precision is more high
PUNTO NULLO
When you using the scale, sometimes the weight window is not [0.0], you can
premere
to make it into [0.0], Zero range =capacity ×+ 4%
5.4.2 Il conteggio delle merci ha l'imballaggio
(1).When the packing box /carton weight is unknown (eg the unit is KG)
has. Put the packing box of 500g on the plate, it will display
[0.500 kg]
[0]
[0]
b. stampa
, verrà visualizzato
OR At this moment you can follow 5.4.1 to continue the counting. When the packing box/carton weight is unknown (eg the unit is G) a. Put the packing box of 500g on the plate, It will display
[500.0g]
[0]
[0]
b. Premere , verrà visualizzato:
[0.0g]
[0]
[0]
-9-
Clear the TARE history Take down the goods and package on the plate, the weight will be [- 0.500kg ] on the basis of KG or [- 500.0g ] on the basis of G, Press, The weight will be [0.0], and this to TARE will disappear.
(2) on the plate, it will display 0.000(it means tared),
and at this moment you start to follow the way of 5.4.1 for counting. (3).1-B. When The weight of packing box/carton is known (eg the unit is G)
There is nothing on the plate, it display [0.0 g] [0] [0] The packing box is 500g, Input 5000, it will display [0.0g ] [5000] [0] Press, it will display [-500.0g] [—-] [—-]
Attention: when weight window display “0.0”(it means the unit is G), input the weight of packing box must be 10 times of the actual weight. (eg:500g package box, you need to input 5000)
A questo punto, puoi prima posizionare la scatola di imballaggio: visualizzerà "0.0" in base a G o "0.000" in base a KG, a indicare che entrambe le unità sono tarate. Quindi, segui il passaggio 5.4.1 per continuare il conteggio. Ci sono alcune merci, tra cui la scatola di imballaggio/cartone, sul piatto.
– 10 –
Eg Packing box is 500g, on the basis of KG, packing box(500g)+goods(30PCS screws)= 0.553kg, it will display
[0.553kg] [0] [0]
Input the weight 1.766 of one screw, press, it will display
[0.553kg] [1.766g] [313]
Input 500(packing box is 500g
)
[553.0g] [1.766g] [313]
Input 5000(actual packing box is 500g), Press the key, it will display
[53.0g] [1.766g] [30] Attention: When weight window display “0.0” (it means the unit is G), input the weight of packing box must be 10 times of the actual weight.(eg:500g package box, you need to input 5000) Clear the TARE history
Togliere la merce e l'imballaggio sul piatto, il peso sarà [-
0.500kg], press, The weight will be [0.0].
5.5. AGGIUNGERE
99Times ADD, 6 Digital
5.5.1 Quantità AGGIUNTA del conteggio ripetuto
5.1.1.1 AGGIUNTA PCS
Put the goods on the plate, follow as 5.4.1 counting, then press
, Ripeti
5.1.1.1, quindi premere
,on the unit weight window will show [2], it means, 2
– 11 –
times ADD. THE Total COUNT(PCS) will show the two times pcs.(eg put 10pcs
screws on the plate, input 10, press SMPL, press
una volta, poi decolla
10pcs screws, put again another 10pcs screws, press
di nuovo. Il conteggio totale
mostrerà che 20 pezzi sono la prima volta e conteranno la seconda volta, ovviamente,
il peso totale è 1a volta + 2a volta)
Quando hai finito di contare tutti i beni, non c'è più alcun bene sul piatto, premi
per controllare il peso totale, i tempi e le quantità. Premere
E
A
cancellare la cronologia ADD.
5.5.2 Peso ADD
Eg the unit is G
Mettere la merce sul piatto, tipo 500 g, premere
Verrà visualizzato [500.0] [1] [0] per 5 secondi, quindi [500.0] [0] [0]
Quindi togli la merce, metti un'altra merce sul piatto come 100 g, premi
Verrà visualizzato [600.0g] [2] [0] per 5 secondi, quindi [100.0g] [0] [0].
Ma quando togli quei beni, premi
di nuovo, puoi semplicemente controllare il
il valore totale è ancora: [600.0g] [2] [0], ovviamente puoi continuare a mettere il
nuovi beni su di esso, premere per il conteggio.
Alla fine, quando hai finito di AGGIUNGERE, non c'è più niente nel piatto, premi
A
Check the total weight. Press
per cancellare la cronologia ADD.
Eg the basis is KG
Metti la merce sul piatto Come 500 g, premi
Verrà visualizzato [0.500 kg] [1] [0] per 5 secondi, quindi [0.500] [0] [0]
Quindi togli la merce, metti un'altra merce sul piatto come 100 g, premi
Verrà visualizzato [0.600kg] [2] [0] per 5 secondi, quindi [0.100g] [0] [0].
– 12 –
Ma quando togli quei beni, premi
di nuovo, puoi semplicemente controllare il
il valore totale è ancora: [0.600kg] [2] [0], ovviamente puoi continuare a mettere il nuovo
merci su di esso, premere
for counting.
Alla fine, quando hai finito di AGGIUNGERE, non c'è più niente nel piatto, premi
A
check the total weight. Press
per cancellare la cronologia ADD.
5.6. Allarme quantità
Eg If over the goods of 30pcs on the plate, you want alarm.
Innanzitutto inserisci 30 pezzi, premi
,Verrà visualizzato
[0.000] [0] [30] for 3 seconds,
quindi visualizza [0.000] [0] [0]
Put the goods on the plate, when counting (follow the way of 5.4.1 eg: put 10pcs
goods on the plate, input 10, press
, then continue to put more goods on
esso), quando i pezzi superano i 30 pezzi, verrà emesso un allarme.
Premere
E
per annullare l'allarme quantità.
5.7. Calibrazione
1. Accendere la bilancia, quando la finestra visualizza "0", immettere 52411 e premere
tasto per entrare nella modalità di calibrazione.
2. Premere
to choose max capacity, press to confirm, for exampon:
30kg, input “30000”, press to confirm
3.Premere
per scegliere la divisione, premere per confermare, ad esempioample, quando tu
premere
continuously, it will display “1,2,5,10,” then you choose the division
di cui hai bisogno. Quindi premi .
– 13 –
4.Premere
per scegliere la posizione del punto, dopo aver premuto costantemente, viene visualizzato
“0””1″”2″”3″”4″”0″ puoi scegliere la posizione di cui hai bisogno, quindi premere
per confermare."0" significa "0", "1" significa "0.0", "2" significa "0.00", "3" significa "0.000",
"4" significa "0.0000" Se non è necessario modificare la capacità, la divisione e il punto, è possibile
potrebbe premere direttamente
per accedere al passaggio successivo
5.Weight window will show the data which poise will load on scale(If you what change load poise, you could input the data you will load on scale). press
,the unit price window will display “LOAD”, then put load/weight, finally press
per confermare.
5.8. Allarmi di limite superiore e inferiore
5.8.1 Selezione dei tipi di allarme
Premere a lungo il tasto
key to enter the settings. The single weight window displays:
Lavaggio a secco
mostra OFF per disabilitare, premendo
shows OUT for out-of-range
allarme, pressante
mostra IN per allarme in-range e premendo
mostra SU
for upper limit alarm only. Press
per salvare e uscire.
Premere brevemente il tasto
tasto per impostare il limite superiore della quantità.
5.8.2Inputting Alarm Values (Note: Long-press the
tasto per attivare l'allarme,
uguale al primo passaggio sopra)
Premere brevemente il tasto
tasto per accedere alle impostazioni, visualizzando (A-FF-O-dn). Il peso
La finestra visualizza i tipi di allarme: A-OUT indica un allarme fuori intervallo, A-IN indica un allarme entro l'intervallo, A-UP indica solo un allarme di limite superiore.
– 14 –
A. Quando la finestra della quantità visualizza DN, immettere il valore del limite inferiore, premere
per confermare e procedere al passaggio successivo. B. Quando la finestra del peso singolo visualizza SU, immettere il valore del limite superiore, premere
per confermare e uscire.
5.8.3Premere
Per disattivare l'allarme e reimpostare il limite superiore e inferiore
valori.
5.9. Impostazioni UART 5.9.1 Dopo l'accensione e l'azzeramento, premere il tasto . seguito dal tasto numerico 8. La finestra del peso visualizzerà "stampa" a indicare la modalità stampante esterna. 5.9.2 Dopo l'accensione e l'azzeramento, premere il tasto . seguito dal tasto numerico 9. La finestra del peso visualizzerà "PC" a indicare il computer.
modalità di caricamento dati, che può essere caricata sul computer tramite Excel
fogli di calcolo.
5.10.Funzione di stampa (Nota: con RS232)
Quando UART passa alla modalità "stampa":
5.10.1 Stampa singola
Quando il peso è diverso da zero, premere il tasto Stampa per stampare il peso corrente, il peso unitario e la quantità. Il formato è il seguente:
– 15 –
5.10.2 Stampa accumulata
When multiple weights are accumulated, first adjust the weight, unit weight, and quantity of the items, press the Add key repeatedly to accumulate, then press the Print key to print the weight, unit weight, and quantity of the items multiple times. In “Print” mode, pressing the “PRT” key after printing will automatically clear the accumulation, or press the combination key “M+”+”CLR” to clear the accumulation. The printing format is as follows:
6. Funzione di caricamento dati del computer (Nota: con RS232)
Quando l'UART passa alla modalità "PC", utilizzare un cavo dati con protocollo RS232-HID per collegare il computer alla bilancia (Nota: le bilance contapezzi con porte RS232 sono dotate di questo cavo dati). Dopo l'accensione e l'azzeramento della bilancia elettronica, aprire un foglio di calcolo Excel sul computer e posizionare gli articoli da pesare sulla bilancia. Quando il peso si stabilizza, si sentirà un "bip" e il foglio di calcolo Excel del computer scriverà automaticamente i dati di peso visualizzati nella finestra di pesatura della bilancia elettronica. Rimuovere gli articoli dalla bilancia e, dopo il ritorno a zero, pesarli nuovamente. Il foglio di calcolo Excel scriverà i dati del secondo peso (non è necessario premere il tasto Stampa). Il formato è il seguente:
– 16 –
7. Attenzione:
1. Keep away from the rain and wash by water if happens, please dry it, and find it cannot work, return to the seller to repair).
2. Please do not store in the high temperature and wet place. 3. Do not let insects into the body. 4. Do not heavy shock and overload. 5. No need using for a long time. please clear it, and take it into the bag, and
charge it each 3 months. Reload it before using . 6. If you have good advise please feel free to tell us.
– 17 –
Common trouble shootingWW
8. Common trouble shooting:
Nessun PROBLEMA
Turn 1 on, show “LB
” and alarm
SIGNIFICA
LOW BATTERY (POWER)
Turn 2 on, show “ED WEIGHING ERROR
“
REASON Battery no power
Batteria rotta
SIGILLATURA DELLA LINEA DELLA CELLA DI CARICO
LA CELLA DI CARICO TOCCA QUALCOSA
CELLA DI CARICO ROTTA
PCB ROTTO
troppo bagnato
TROPPO DURO
3
Turn on, hop counting
Il numero della finestra di peso in fase di modifica
cannot weigh
LA CELLA DI CARICO TOCCA QUALCOSA LA LINEA DELLA CELLA DI CARICO
SEALING -OFF
CELLA DI CARICO ROTTA
Quando
The weight window
4 charging, co number on changing
unting
non può caricare
PCB BROKEN Adapter
Digital 8 non
5
spettacolo completo
Digital 8 not full show, or less
cortocircuito circuito elettronico LCD rotto
Unità rotta
the key is stuck
the key cannot spring
Indietro
6
key cannot work
Press the key can’t work
key electronic circuit short
PCB ROTTO
TASTIERA
CORRODES
la linea della cella di carico e il PCB
7 NESSUN PESO
nessun peso
broken link
LINEA CELLA DI CARICO
CONSIGLIO DI RICARICA
cambiare la batteria
RINOSIGILLATURA
CONTROLLO
SOSTITUIRE LA CELLA DI CARICO
SOSTITUIRE IL PCB ASCIUGARE il PCB e caricare
cella smonta il PCB, utilizzando la pulizia con alcol
first, then dry it
CONTROLLO
RINOSIGILLATURA
SOSTITUIRE LA CELLA DI CARICO
CHANGE THE PCB
change the adapter
utilizzando fili isolati in gomma, collegare insieme per cambiare il LED
change the display board checking
cambiare la chiave
utilizzando un collegamento di fili isolati in gomma insieme
CAMBIARE IL PCB CAMBIARE LA CHIAVE
ASSE
controllo
RINOSIGILLATURA
– 18 –
can’t turn
premere il tasto on/off
8
we
button, can’t turn on
quando si accende
DID DID DID
quando accendi DI DI DI
9 suona tutto il
suono tutto il tempo
tempo
accendi l'audio
10 normal, but no words
accendi 11 show "8" tutto
il tempo
turn on the sound normal, but no words
when turn on the scale, all the window
show 8, can not weighing, and the sound it is normal When charging AC light is working, but can not charge
non può
12
ricaricare
Quando la spia di ricarica CA non funziona,
nessuna retroilluminazione 13 per il display LCD
Turn on, there is no light for the LCD
SIGILLATURA - CELLA DI CARICO ROTTURA
PCB BROKEN the ON/OFF BUTTON
BROKEN CHECK THE BATTERY POWER IS ENOUGH
PCB ROTTO CONTROLLARE CHE LA POTENZA DELLA BATTERIA SIA SUFFICIENTE
PCB ROTTO controlla la scheda display per
Il collegamento PCB è ok, la scheda di visualizzazione è rotta, controlla la scheda di visualizzazione per
PCB link is ok
pannello di visualizzazione rotto
Adapter Battery broken
adapter adapter charging connect broken the charging connect to the PCB link off PCB BROKEN Battery broken power save function check the LCD part if have sealing-off LCD Broken
SOSTITUIRE LA CELLA DI CARICO
CHANGE THE PCB CHANGE THE ON/OFF
BOTTONE BASSO
VOLT, RICARICA
BATTERIA ROTTA SOSTITUIRLA, V<5.25V
SOSTITUIRE IL PCB BASSO
VOLT, RICARICARE LA BATTERIA ROTTA, SOSTITUIRLA, V<5.25V, SOSTITUIRE IL PCB
disattiva, ricollega il collegamento della scheda display
cambiare il tabellone
disattiva, ricollega il collegamento della scheda display
cambiare il tabellone
change the adapter
cambiare la batteria
change the adapter take down recharging change the connect part
risigillatura
SOSTITUIRE IL PCB sostituire la batteria ripristinare la retroilluminazione
funzione
RINOSIGILLATURA
SOSTITUIRE IL DISPLAY LCD
– 19 –
Elementi
Descrizione
1 Territorio di vendita Nord America
2 Nome
Scala di conteggio
Modello 3
KF-H2D
4 parametro
Classificazione: AC110V/60HzCapacità: 30kgDivisione: 1gRS232
Elementi
Descrizione
1 Territorio di vendita Nord America
2 Nome
Scala di conteggio
Modello 3
KF-H2C
4 parametro
Classificazione: AC110V/60HzCapacità: 30kgDivisione: 1gRS232
Elementi
Descrizione
1 Territorio di vendita Europa
2 Nome
Scala di conteggio
Modello 3
KF-H2C
4 parametro
Classificazione: AC220-240V/50HzCapacità: 30kgDivisione: 1g RS232
Elementi
Descrizione
1 Territorio di vendita Australia
2 Nome
Scala di conteggio
Modello 3
KF-H2C
4 parametro
Classificazione: AC220-240V/50HzCapacità: 30kgDivisione: 1g RS232
– 20 –
Elementi
Descrizione
1 Territorio di vendita Nord America
2 Nome
Scala di conteggio
Modello 3
KF-H2C
4 parametro
Classificazione: AC110V/60HzCapacità: 30kgDivisione: 1g
Elementi
Descrizione
1 Territorio di vendita Europa
2 Nome
Scala di conteggio
Modello 3
KF-H2C
4 parametro
Rating(s): AC220-240V/50HzCapacity: 30kgDivision: 1g
Elementi
Descrizione
1 Territorio di vendita Nord America
2 Nome
Scala di conteggio
Modello 3
KF-H2C
4 parametro
Valutazione(i): AC110V/60HzCapacità: 15kgDivisione: 0.5gRS232
– 21 –
Produttore: Shanghaimuxinmuyeyouxiangongsi Indirizzo: Shuangchenglu 803nong11hao1602A-1609shi, baoshanqu, shanghai 200000 CN. Importato in AUS: SIHAO PTY LTD. 1 ROKEVA STREETEASTWOOD NSW 2122 Australia Importato negli USA: Sanven Technology Ltd. Suite 250, 9166 Anaheim Place, Rancho Cucamonga, CA 91730
EC REP E-CrossStu GmbH Mainzer Landstr.69, 60329 Francoforte sul Meno. YH CONSULENZA LIMITATA.
UK REP C/O YH Consulting Limited Ufficio 147, Centurion House, London Road, Staines-upon-Thames, Surrey, TW18 4AX
– 22 –
Supporto tecnico e certificato di garanzia elettronica www.vevor.com/support
-1-
Technical support and electronic warranty certificate www.vevor.com/support
Counting balance USER MANUAL
MODELLO: KF-H2C / KF-H2D
We continue to be committed to providing you tools with competitive price. “Save Half”, “Half Price” or any other similar expressions used by us only represents an estimate of savings you might benefit from buying certain tools with us compared to the major top brands and does not necessarily mean to cover all categories of tools offered by us. You are kindly reminded to verify carefully when you are placing an order with us if you are
risparmiando effettivamente la metà rispetto ai marchi più importanti.
-2-
MODELLO: KF-H2C / KF-H2D
BILANCIA PER CONTEGGIO
(L'immagine è solo di riferimento, fare riferimento all'oggetto reale)
HO BISOGNO DI AIUTO? CONTATTACI! Hai domande sul prodotto? Hai bisogno di supporto tecnico? Non esitate a contattarci:
Supporto tecnico e certificato di garanzia elettronica www.vevor.com/support
Questa è l'istruzione originale, si prega di leggere attentamente tutte le istruzioni del manuale prima di utilizzare. VEVOR si riserva una chiara interpretazione del nostro manuale utente. L'aspetto del prodotto sarà soggetto al prodotto ricevuto. Vi preghiamo di perdonarci se non vi informeremo di nuovo se ci sono aggiornamenti tecnologici o software sul nostro prodotto.
-1-
ONE. Main technical function.
1. Funzione:
Auto Zero; Count; ADD; TARE; Backlight
2. Potenza:
AC 220-240V (±10%) 50Hz ± 1Hz AC
110V (± 10%) 60Hz ± 1Hz
Rechargeable Battery DC 6V / 4AH
3. Consumo energetico
38mA DC DC 58mA with backlight
4. Watt 0.4W with backlight 5. Low power alarm
When the indicator (
) is displayed, this means that it needs to be loaded. If you
keep using it, it is easy to break the scale.
B. Technical data
Capacity 1:
capacità
(N)
(f) (d)
(massimo)
(min) zero Tare (max) Overload (max+9e)
15000 .0 15000 .0 0.5 0.5
0 ~ 1500 0.0
15000.0 g 10 g ±300 g
g
g
gg
g
30,000 kg
30,000
Da 0 a 30,000
1 g 1 g 30,000 kg 20g ±600g
kg
kg
1500 4.5 g 30,009 kg
Notes: FS = MAXIMUM WEIGHT; d = division
Nota aggiuntiva
When division 1 g, the unit is usually KG (e.g. 1 g, 2 g, 5 g), when division < 1 g, the unit is usually G (e.g. 0.1 g, 0.2 g, 0.5 g)
-2-
C. Instructions for use.
1. Prima dell'uso
(1). Please place the scale on a flat and firm place. You can tighten or loosen the four feet to make sure they are on the same level. there is a level ball on it. (2). Do not use it in harsh environments such as strong wind and sun. (3). Please use only the electricity supplier. (4). Do not put anything on the plate when you turn it on. (5). When weighing, try to place the food in the center of the plate as best as possible, without overloading it. (6). Turn on the scale after 15 to 20 minutes, the weighing is better.
(7) . Show
must first be loaded.
2. Visualizzazione:
A: When the unit is KG, the weight will display 0.000 as shown in the picture:
or
-3-
B: When the unit is G, the weight will display 0.0 as shown in the picture:
or (1). WEIGHT
6 digital for goods weight and add weight and the left digital can display [- ]
(2). UNIT WEIGHT
5 digital for unit weight and adding times. The point is they can change.
(3). QUANTITY
6digital for goods pieces
3. Symbol “ ”
(1). or Net or Tare: means the package weight has been reduced (2). or Zero means no weight (3).+ or M+ means ADD (4). or Stable or ~: Means on stable (5). SMPLOW: means the sample is not enough. the sample weight on the plate is less than the minimum sample weight, please add the pieces, this symbol will disappear. (6). QTYPST UWLOW When the pieces number is low as you set, it will alarm and QTYPST UWLOW .
(7).
Means power is low, need to charge.
Notato
-4-
High precision counting scale: Minimum sample weight = 20d Minimum unit weight = 0.2d (d= division )
counting scale: Minimum sample weight = 40d Minimum unit weight = 0.8d (d= division )
4. TASTIERA
OR
(Without RS-232) (with RS-232)
4.1 Descrizione della funzione del tasto composito
+ Numeric keys (0 to 2) convert units. + Numeric keys (4 to 6) adjust brightness. + set the upper and lower limits of the alarm. Long press to enter the alarm setting. Press to close. Press to set the outside of the upper and lower limits of the alarm. Press to set the inside of the upper and lower limits of the alarm. Press to set the upper limits of the alarm. Press to confirm.
4.2 Tasto funzione
-5-
: When the unit weight is unknown, set the number of items to be sampguidato.
: When the unit weight is known, confirm the entered weight; : Use this key to set the alarm value when a fixed number of alarms is required;
: Turn off the alarm function;
: Add up the quantity of goods; : Cancel the total amount of accumulated items; : Remove the tare weight; : Reset the scale to zero as much as possible; : Clear the number; : Print the current weight, single weight, quantity, and cumulative data. (Note: with RS232)
5. FUNZIONE
5.1. ON-OFF button n
Switching ON/OFF to “ ” means turning on.
“Turn ON/OFF” also means power off.
5.2. Auto Backlight
Press , when it displays “
» press
, I will display ” “
. Place the goods on the plate, weight > 10d, light is
automatically on, when it is at zero, the light is automatically off.
Luce sempre accesa
-6-
Press when it displays “
“, press it will display
” “, the light will be on permanently.
Lights off all the time
Press , when it displays “
» Press , it will display “
“, the light will go out all the time.
When you turn off the scale, it remembers what you chose
5.3. Unit Kg/g/lb to choose
Press , when is displayed “
» then press , the unit is
“kg”.
Press , when is displayed “
» then press , the unit is
“g”.
Press , when is displayed “
» then press , the unit is
“lb”.
5.4. Counting 5.4.1 Before counting, you must obtain samples to know the number of pieces or unit weight. (1) When the unit weight is unknown
Posizionare la samples of the relevant goods on the plate (the weight of each sample must be the same): For example (A): when the unit is G, place 30 screws of the same weight on the plate. It will display:
Weight Unit weight Total number
[ 53.1 g ] [ 0 ] [ 0 ]
Enter the PCS “30” of the sample s(Vis), it will display:
Weight Unit weight Total number
[ 53.1 g] [ 3 0] [0]
-7-
then on , it will display:
Weight Unit weight Total number
[ 53.1 g ] [ 1.77 g ]
[ 30 ]
At this time, you can continue to put more goods (eg: screws) on the plate, the total weight and total number will constantly change, the unit weight will not be changed. For example (B): when the unit is KG, put 30 screws of the same weight on the plate. The following message will be displayed:
Weight Unit weight Total number
[ 0.053 kg ] [ 0 ] [ 0 ]
Enter the PCS “30” of the sample s (screw), it will display:
Weight Unit weight Total number
[ 0.053 kg] [ 3 0] [0]
then on , it will display:
Weight Unit weight Total number
[ 0.053 kg ] [ 1.766 g ]
[ 30 ]
At this time, you can continue to put more goods (eg screws) on the plate, the total weight and total number will constantly change, the unit weight will not be changed.
(3) Now know the unit weight (e.g. screws)
When we know that the weight of a screw is 1.766 g,
A: If the unit is G, I enter the unit weight 1.766, it will display:
[0.0 g] [1.766 g] [0]
Then press , and place as many products (eg: 30 screws) on the plate,
[ 53.0 g ] [ 1.766 g ] [ 3 0 ]
-8-
If at this time you continue to put more pieces, the total weight and total number on the window will constantly change, the unit weight will not change.
B: If the unit is KG , I input the unit weight 1.766, it will display: [0.0 00 kg] [ 1.766 g ] [0] Then press , and put the most goods (for example: 30 screws) on the plate, [ 0.053 kg ] [ 1.766 g ] [ 3 0 ] Finally, when you remove all the goods from the plate, the unit window still displays the value, you can press .
Le sample is larger, the accuracy is higher
ZERO POINT When using the scale, sometimes the weight window is not [0.0], you can press to change it to [0.0], Zero range = capacity × + 4%
5.4.2 Counting packed goods
(1). When the weight of the packing box/carton is unknown (for example, the unit is KG) a. Put the 500g packing box on the plate, it will display [0.500kg] [0] [0] b. Press , I will display it
-9-
OR At this time, you can follow 5.4.1 to continue counting. When the weight of the packing box/carton is unknown (for example, the unit is G) a. Put the 500g packing box on the plate, It will display [500.0g] [0] [0] b. Press , it will display: [0.0g] [0] [0] Clear TARE History
Take out the goods and pack them on the plate, the weight will be [-0.500kg] based on KG or [-500.0g] based on G, press , the weight will be [0.0] and this TARE will disappear. (2). 1-A. When the weight of the packaging box/carton is known (for example, the unit is KG) There is nothing in the plate, it is displayed [0.00 0 ] [0] [0]
– 10 –
The packaging box is 500g, enter 500, it will be displayed
[0.00 0 ] [ 50 0] [0]
Pres [TARE], it will display
[- 0.500 ] [—-] [—-] Then place this packing box on the plate, it will display 0.000 (this means tared), and at this time you start to follow the method of 5.4.1 to count. (3).1-B. When the weight of the packing box/carton is known (by
example, the unit is G)
There is nothing on the plate, it is displayed
[0.0 g] [0] [0]
The packaging box weighs 500g, enter 5000, it will be displayed
[0.0 g] [50 0 0] [0]
Premere
, it will display
[- 500.0 g ] [—-] [—-]
Attention: When the weighing window displays “0.0” (it means the unit is G), the weight of the packing box should be 10 times the actual weight. (For example: for a 500 g packing box, you should input 5000) At this time, you can first place the packing box, it will display “0.0” based on G or “0.000” based on KG, which means both are tared. Then start to follow step 5.4.1 to continue counting.
There are some goods including the packing box/carton on the plate. For example, the packing box weighs 500g, based on KG, packing box (500g) + goods (30 screws) = 0.553kg, it will display [0.553kg] [0] [0]
Enter the weight 1.766 of a screw, press , it will display
[0.553 kg] [1.766 g] [313]
– 11 –
Input 500 (the packing box weighs 500g), press , it will display
[ 0.053kg ] [ 1.766g ] [ 30 ] For example, the packing box weighs 500g, based on G, packing box (500g) + goods (30 screws) = 553.1g , it will display [ 553.0g ] [ 0 ] [ 0 ]
Input the weight 1.766 of a screw , press , it will display
[ 553.0g ] [ 1.766g ] [ 313 ] Input 5000 (the actual weight of the packing box is 500g ), press
the key, it will display
[ 53.0g ] [ 1.766g ] [ 30 ] Attention: when the weight window displays “0.0” (this means the unit is G), the weight of the packing box should be 10 times the actual weight (for example: for a 500g packing box, you should enter 5000). Clear TARE history
Remove the goods and pack them on the plate, the weight will be [- 0.500
kg], press ,The weight will be [0.0].
5.5. AGGIUNGERE
99 times ADD, 6 digital
5.5.1 Repeat Count ADD Quantity
5.1.1.1 ADDING PCS
Place the goods on the plate, follow the counting as shown in
point 5.4.1, then press
, Repeat 5.1.1.1, then press
,on
the unit weight window, [2] will be displayed, that means, 2 times ADD. The number
total (PCS) will display both parts. (e.g., place 10 screws on the
plate, enter 10, press SMPL, press once, then remove 10 screws,
– 12 –
put back 10 more screws, press again. The total number will show 20 pieces is the 1st time and the number of 2nd time , of course, the total weight is the 1st time + the 2nd time) When you finish counting all the goods , there is nothing in the plate, Press to check the total weight, times and quantities. Press
and to clear the ADD history. 5.5.2 Weight ADD For example, the unit is G
Put the goods into the plate as 500g, press It will display [ 500.0 ] [1] [0] for 5 seconds, then to [ 500.0 ] [0] [0] Then remove the goods, put another goods into the plate, for example 100g, press It will display [ 600.0g ] [2] [0] for 5 seconds, then to [ 100.0g ] [0] [0]. But when you remove these goods, press again, you can just check the total value is still: [ 600.0g ] [2] [0], of course, you can continue to put the new goods into it, press to count. Finally, when you finish ADD, there is nothing in the plate, Press to check the total weight. Press to clear the ADD history. For example, the base is KG Put the goods in the plate Like 500g, press It will display [ 0.500 kg ] [1] [0] for 5 seconds, then to [ 0.500 ] [0] [0] Then remove the goods, put another goods on the plate, for example 100g, press
– 13 –
It will display [ 0.600 kg ] [2] [0] for 5 seconds, then to [ 0.100 g ] [0] [0]. But when you take out these goods, press again, you can just check the total value is still: [ 0.600 kg ] [2] [0], of course, you can continue to put the new goods in it, press to count. Finally, when you finish ADHD, there is nothing in the plate, Press to check the total weight. Press to clear ADD history.
5.6. Allarme quantità
Per esempioample, if the quantity of goods in the plate exceeds 30 pieces,
you want to trigger an alarm.
First, enter 30 coins, press
,Verrà visualizzato
[0.000] [0] [30] for 3 seconds,
quindi visualizza [0.000] [0] [0]
Put the goods on the plate, when counting (follow the method of
5.4.1 per esample: place 10 pieces of goods on the plate, enter 10,
press , then continue to put more goods in it), when the
If the number of coins exceeds 30 coins, an alarm is triggered.
Press and to cancel the quantity alarm.
5.7. Calibrazione
1. Turn on the scale, when the window displays “0”, enter 52411 and press the key to enter calibration mode.
– 14 –
2. Press to choose the maximum capacity, press to confirm, for example: 30 kg, enter “30000”, press to confirm 3. Press to choose the division, press to confirm, for example, when you press continuously, “1, 2, 5, 10” is displayed, then choose the division you want. Then press . 4. Press to choose the point position, after pressing continuously, it displays “0”, “1”, “2”, “3”, “4”, “0”, you can choose the position you need, then press to confirm. “0” means “0”, “1” means “0.0”, “2” means “0.00”, “3” means “0.000”, “4” means “0.0000” (If you don’t need to change the capacity, division and point, you can directly press to go to the next step 5. The weight window will display the data that the weight will be loaded on the scale (if you want to change the load weight, you can input the data that you will load on the scale). Press , the unit price window will display “LOAD”, then input the load/weight, finally press to confirm.
5.8. Upper and lower limit alarms
5.8.1 Alarm types selection Long press the key to enter the settings. The
single weight window displays: Press OFF to turn off, press
OUT to display the out of range alarm, press IN to display
– 15 –
the alarm in the range and press UP to display the
upper limit alarm only. Press to save and exit.
Short press the key to set the upper limit of the quantity. 5.8.2 Entering alarm values (Note: Long press the
key to activate the alarm, as in the first step above)
Short press the key to enter the settings and display (A-FF-O-dn). The weight window displays the alarm types: A-OUT indicates an out-of-range alarm, A-IN indicates an in-range alarm, A-UP indicates only an upper limit alarm. A. When the quantity window displays DN, enter the lower limit value, press to confirm and go to the next step. B. When the single weight window displays UP, enter the upper limit value, press to confirm and exit.
5.8.3 Press to deactivate the alarm and reset the upper and lower limit values.
5.9. UART Settings 5.9.1 After powering up and zeroing, press the . key followed by the number 8 key. The weight window will display “print” indicating external printer mode. 5.9.2 After powering up and zeroing, press the . key followed by the number 9 key. The weighing window will display “PC” indicating computer data download mode, which
– 16 –
can be downloaded to the computer using Excel spreadsheets
.
5. 10 .Print function (Note: with RS232 ) When the UART enters “print” mode:
5. 10 .1 Single print
When the weight is not zero, press the Print key to print the current weight, unit weight and quantity. The format is as follows:
5.10.2
Impressione
cumulativo
When multiple weights are accumulated, first adjust the weight, unit weight and quantity of the items, press the A dd key repeatedly to accumulate, and then press the Print key to print the weight, unit weight and quantity of the items repeatedly. In “Print” mode, press the “PRT” key after printing to automatically clear the accumulation, or press the “M+”+”CLR” combination key to clear the accumulation. The print format is as follows:
– 17 –
6. Computer data download function (Note: with RS232 )
When the UART switches to “PC” mode, use an RS232 to HID protocol data cable to connect the computer to the scale (Note: Counting scales with RS232 ports are supplied with this data cable). Open an Excel spreadsheet on the computer After the electronic scale is powered on and zeroed, place the items to be weighed on the scale. When the weight stabilizes, a “beep” will sound, and the computer’s Excel spreadsheet will automatically write the displayed weight data to the weighing window of the electronic scale. Remove the items from the scale, and after it returns to zero, weigh again. The Excel spreadsheet will write the second weight data (no need to press the Print key). The format is:
7 . Caution:
7. Keep away from rain and water washing ( if this happens , Please dry it easily , and find it can not work , return to seller for repair ) .
8. Please do not store in high temperature and humid place . 9. Do not let insects enter the body .
– 18 –
10. Do not subject to strong shock or overload. 11. No need to use it for a long time. Please erase it,
and put it in the bag, and charge it every 3 months. Recharge it before using it. 12. If you have any good advice, please let us know.
– 19 –
8. Routine troubleshooting:
NO
WORRY
To light up,
display
1
“LB” and
allarme
LOW BATTERY MEANS
(ENERGIA)
Accendere,
2
mostrare “
WEIGHING ERROR
ED »
3
Turn on, count the
salti
Weight window number changes, cannot
pesare
4
When charging, counting
Weight window number changes, cannot
carico
Digital 8 5 is not
completare
Digital 8 is not complete, or less
the key does not
premere il tasto
6
lavori
non posso
REASON Battery without power
Broken battery
LOAD CELL LINE SEALING
– OFF LOAD CELL
IN CONTACT WITH SOMETHING BROKEN LOAD
CELL BROKEN PCB TOO WET
TOO STRONG LOAD
CELL IN CONTACT WITH SOMETHING
LOAD CELL LINE SEALING – OFF BROKEN
CELLA DI CARICO
BROKEN PCB
Adattatore
electronic short circuit
Broken LCD display Broken disk
Key is stuck Key can’t return
ADVISOR CHARGING
cambiare la batteria
RE-CLOSING
CONTROLLO
CHANGE LOAD CELL
CHANGE PCB DRY PCB and
load cell disassemble PCB using alcohol cleaner first, then
dry it CHECK RE-CLOSING
MODIFICA CELLA DI CARICO CHANGE PCB change adapter using rubber insulated wire connecting together change LED change display board check change key
– 20 –
non
funzione
Indietro
short circuit of the key electronic circuit
using a rubber insulated wire connecting together
BROKEN PCB
CHANGE THE PCB
KEYBOARD CORROSION
CHANGE THE KEYBOARD
the cell line of
load and PCB link are
verifica
rotto
NESSUNO
7
PESO
no weight
LOAD CELL LINE SEALING
- OFF
RE-CLOSURE
LOAD CELL CHANGE CELL
ROTTO
SCARICO
BROKEN PCB
CHANGE THE PCB
the on/off button CHANGE THE BUTTON
è rotto
ACCESO/SPENTO
CHECK THAT THE
8
can’t turn on
press the on/off button,
cannot turn on
BATTERY POWER IS QUITE
ALTO
BASSO VOLTAGE, CHARGING
BROKEN BATTERY
CHANGE IT, V<5.25V
BROKEN PCB
CHANGE THE PCB
CHECK THAT THE
when we turn on DI DI when we turn on DI DI 9 DI its all the DI its all the time
tempo
BATTERY POWER IS QUITE
ALTO
BASSO VOLTAGE, RECHARGE
BROKEN BATTERY CHANGE IT, V<5.25V
BROKEN PCB
CHANGE THE PCB
turn on the sound normally 10, but no
parole
turn on the sound normally, but
no words
check that the connection between the display panel and the PCB is ok rotto
pannello di visualizzazione
turn off, connect the billboard link
change the billboard
11
Turn on the show “8” all the
tempo
when the scale is turned on, all windows display 8, cannot weigh, and the noise is normal
check that the connection between the display panel and the PCB is ok rotto
pannello di visualizzazione
turn off, connect the billboard link
change the billboard
12 cannot When charging, the
Adattatore
change the adapter
– 21 –
ricaricare
AC light works, but cannot charge
When the AC charging indicator light does not work,
13
no backlight
for the LCD screen
Turn on, there is no light on the
Schermo LCD
Broken battery
adapter plug adapter broken charging connection
collegamento di ricarica
to PCB link is disabled BROKEN PCB
Broken battery power saving function
check if LCD part
is sealed
Broken LCD screen
cambiare la batteria
change adapter disassemble charging change
connection part
re-sealing CHANGE PCB change battery reset retroilluminazione
funzione RE-SEAL CHANGE LCD SCREEN
Items 1 Sale Territory 2 Name 3 Model
4 parametro
Descrizione
America del Nord
KF-H2D Counting Scale Rated Power: 110V AC/60Hz, Capacity: 30kg, Division: 1g, RS 232
Items Territory of 1 sale 2 Name 3 Model
Description North America KF-H2C Counting Scale
– 22 –
4 parametro
Rated power: 110 V AC/60 Hz, capacity: 30 kg, division: 1 g, RS 232
Items 1 Sale Territory 2 Name 3 Model
4 parametro
Descrizione
Europa
Counting Scale KF-H2C Rated power: 220-240 V AC/50 Hz, capacity: 30 kg, division: 1 g, RS 232
Items 1 Sale Territory 2 Name 3 Model
4 parametro
Descrizione
Australia
Counting Scale KF-H2C Rated power: 220-240V AC/50Hz, Capacity: 30kg, Division: 1g, RS 232
Items 1 Sale Territory 2 Name 3 Model
4 parametro
Descrizione
America del Nord
KF-H2C Counting Scale Rated Power: 110V AC/60Hz, Capacity: 30kg, Division: 1g
– 23 –
Items 1 Sale Territory 2 Name 3 Model
4 parametro
Descrizione
Europa
Counting Scale KF-H2C Rated power: 220-240 V AC/50 Hz, capacity: 30 kg, division: 1 g
Items 1 Sale Territory 2 Name 3 Model
4 parametro
Descrizione
America del Nord
KF-H2C Counting Scale Rated power: 110V AC/60Hz, Capacity: 15kg, Division: 0.5g, RS 232
– 24 –
Manufacturer: Shanghaimuxinmuyeyouxiangongsi Address: Shuangchenglu 803nong11hao1602A-1609shi, baoshanqu, Shanghai 200000 CN. Imported into Australia: SIHAO PTY LTD. 1 ROKEVA STREETWOOD NSW 2122 Australia Imported into the USA: Sanven Technology Ltd. Suite 250, 9166 Anaheim Place, Rancho Cucamonga, CA 91730
EC REP E-CrossStu GmbH Mainzer Landstr.69, 60329 Francoforte sul Meno. YH CONSULENZA LIMITATA.
UK REP C/O YH Consulting Limited Ufficio 147, Centurion House, London Road, Staines-upon-Thames, Surrey, TW18 4AX
– 25 –
Technical Support and Electronic Warranty Certificate www.vevor.com/support
-1-
Technischer Support und E-Garantie-Certifikat www.vevor.com/support
Manuale dell'utente
MODELLO: KF-H2C / KF-H2D
We continue to be committed to providing you tools with competitive price. “Save Half”, “Half Price” or any other similar expressions used by us only represents an estimate of savings you might benefit from buying certain tools with us compared to the major top brands and does not necessarily mean to cover all categories of tools offered by us. You are kindly reminded to verify carefully when you are placing an order with us if you are
risparmiando effettivamente la metà rispetto ai marchi più importanti.
-2-
MODELLO: KF-H2C / KF-H2D
BILANCIA PER CONTEGGIO
(Das Bild dient nur als References, bitte beziehen Sie sich auf das tatsächliche Objekt)
HO BISOGNO DI AIUTO? CONTATTACI! Hai domande sul prodotto? Hai bisogno di supporto tecnico? Non esitate a contattarci:
Supporto tecnico e certificato di garanzia elettronica www.vevor.com/support
Questa è l'istruzione originale, si prega di leggere attentamente tutte le istruzioni del manuale prima di utilizzare. VEVOR si riserva una chiara interpretazione del nostro manuale utente. L'aspetto del prodotto sarà soggetto al prodotto ricevuto. Vi preghiamo di perdonarci se non vi informeremo di nuovo se ci sono aggiornamenti tecnologici o software sul nostro prodotto.
Documenti / Risorse
 |
VEVOR KF-H2C,KF-H2D Counting Scale [pdf] Manuale d'uso sku4, sku10, KF-H2C KF-H2D Counting Scale, KF-H2C KF-H2D, Counting Scale, Scale |